Docker 101
Content:
4. Add MySQL DB, Multi-Container apps
Multi-Container Apps
Up to this point, we have been working with single container apps. We now want to add MySQL to the application stack. The following question often arises - “Where will MySQL run? Install it in the same container or run it separately?” In general, each container should do one thing and do it well. A few reasons:
- There is a good chance you will have to scale APIs and front-ends differently than databases.
- Separate containers let you version and update versions in isolation.
- While you may use a container for the database locally, you may want to use a managed service for the database in production. You don’t want to ship your database engine with your app then.
- Running multiple processes will require a process manager (the container only starts one process), which adds complexity to container startup/shutdown.
And there are more reasons. So, we will update our application to work like this:
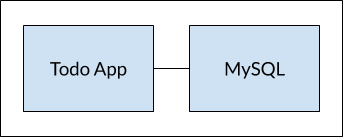
Container Networking
Remember that containers, by default, run in isolation and don’t know anything about other processes or containers on the same machine. So, how do we allow one container to talk to another? The answer is networking. Now, you don’t have to be a network engineer. Simply remember this rule…
If two containers are on the same network, they can talk to each other. If they aren’t, they can’t.
Starting MySQL
We will create a Docker network first and attach the MySQL container at startup.
-
Create the network.
docker network create todo-app -
Start a MySQL container and attach it to the network. We’re also going to define a few environment variables that the database will use to initialize the database (see the “Environment Variables” section in the MySQL Docker Hub listing).
docker run -d \
--network todo-app --network-alias mysql \
-v todo-mysql-data:/var/lib/mysql \
--name mysql \
-e MYSQL_ROOT_PASSWORD=secret \
-e MYSQL_DATABASE=todos \
mysql:8
Notice that we specified the
--network-aliasflag. We’ll come back to that in just a moment.Info: You’ll notice we’re using a volume named
todo-mysql-datahere and mounting it at/var/lib/mysql, which is where MySQL stores its data. However, we never ran adocker volume createcommand. Docker recognizes we want to use a named volume and if it does not exist, creates one automatically for us.Info 2: If you see a
docker: no matching manifesterror, it’s because you’re trying to run the container in a different architecture than amd64, which is the only supported architecture for the mysql image at the moment. To solve this add the flag--platform linux/amd64in the previous command. -
To confirm we have the database up and running, connect to the database and verify it connects.
docker exec -it mysql mysql -pNote:
docker execruns a command in a already running container. You need to typemysqltwice! The first one is the name of the container to run the command in, the second is the name of the command, the MySQL CLI. The-pbelongs to the MySQL CLI and prompts for the password. -
When the password prompt comes up, type in secret. In the MySQL shell, list the databases and verify you see the todos database.
mysql> SHOW DATABASES;You should see output that looks like this:
 +--------------------+
 | Database           |
 +--------------------+
 | information_schema |
 | mysql              |
 | performance_schema |
 | sys                |
 | todos              |
 +--------------------+
 5 rows in set (0.00 sec)
We have our todos database and it’s ready for us to use!
Type ‘exit’ to get out the MySQL commandline.
Running our App with MySQL
The todo app supports the setting of a few environment variables to specify MySQL connection settings. They are:
- MYSQL_HOST - the hostname for the running MySQL server
- MYSQL_USER - the username to use for the connection
- MYSQL_PASSWORD - the password to use for the connection
- MYSQL_DB - the database to use once connected
With all of that explained, let’s start our dev-ready container!
-
Specify each of the environment variables above, as well as connect the container to our app network
docker run -dp 3000:3000 \ --name todo \ --network todo-app \ -e MYSQL_HOST=mysql \ -e MYSQL_USER=root \ -e MYSQL_PASSWORD=secret \ -e MYSQL_DB=todos \ todo-app -
If we look at the logs for the container (
docker logs todo), we should see a message indicating it’s using the mysql database.Waiting for mysql:3306. Connected! Connected to mysql db at host mysql Listening on port 3000 -
Open the app in your browser and add a few items to your todo list.
-
Connect to the mysql database and prove that the items are being written to the database. Remember, the password is secret.
docker exec -it mysql mysql -p todosAnd in the mysql shell, run the following:
 mysql> select * from todo_items;
 +--------------------------------------+--------------------+-----------+
 | id                                   | name               | completed |
 +--------------------------------------+--------------------+-----------+
 | ec1a721c-c700-487f-8c86-3b8424c78997 | Image optimization |         0 |
 | 60669727-2d49-4656-a31a-aa7b808b12f6 | Useful commands    |         0 |
 +--------------------------------------+--------------------+-----------+
Recap
At this point, we have an application that now stores its data in an external database running in a separate container using volumes to persist data. We learned a little bit about container networking to connect two containers.
Next Step: Image Building Best Practises