Docker 101
Content:
6. Docker Compose
If you want to follow the instructions in this section, you need to remove the running todo-app and mysql containers first:
docker rm -f todo
docker rm -f mysql
Docker Compose is a tool for defining and running multi-container applications (workloads). Compose simplifies the control of your entire application stack, making it easy to manage services, networks, and volumes in a single, comprehensible YAML configuration file. Then, with a single command, you create and start all the services from your configuration file.
The term ‘service’ is new in the context of this workshop: a service is a building block in a Docker Compose application, it is an abstraction layer over a Docker container. A Docker Compose application is typically made up of more than one service or container.
Docker Compose relies on a YAML configuration file, usually named docker-compose.yaml. The docker-compose.yaml file follows the rules provided by the Compose Specification in how to define multi-container applications.
Docker Compose is part of Docker Desktop (for Mac, Windows, Linux). If you are using docker-ce on Linux, you may need to install docker-compose manually, refer to your distribution on how to do this.
In our ToDo example in this workshop, using docker-compose actually makes sense:
- We have two containers, ToDo app and MySQL, that means we need to create two services
- Both services require environment variables for configuration
- The MySQL service requires a volume to persistently store data
- We need a network for the services to communicate with each other
Instead of using several docker commands we can use docker-compose and a single configuration file docker-compose.yaml. (There is a sample docker-compose.yaml file in the app directory.)
Structure of docker-compose.yaml
The following picture compares a docker run command for the ToDo app on the left with a docker-compose.yaml file on the right:
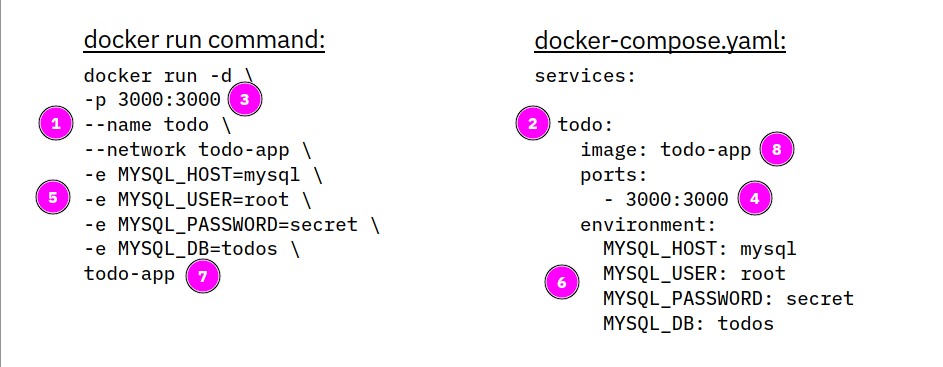
- A container in Docker Compose is called a service, hence the yaml file must begin with the
services:statement. - The service name
todo(2) is equivalent to the--nametag (1) indocker run, it will provide a name for the running container *. - The ports of
-p(3) will go in theports:section (4) - One or more environment variables (5) will go in the
environment:section (6) - The last parameter of the
docker runcommand is always the name of the container image (7), this will go into theimagesection (8)
*) Actually, the name of the service (e.g. todo) will be the network name or alias of the running container. The container name will be a combination of the directory name in which the docker-compose.yaml is located, the service name and a number, e.g. app-todo-1. Depending on the Docker version you may be able to specify a specific name for your workload by adding a name: statement to docker-compose.yaml as described here.
Now we will add the MySQL container.
Again the docker runcommand for MySQL on the left, on the right we add to the docker-compose.yaml:
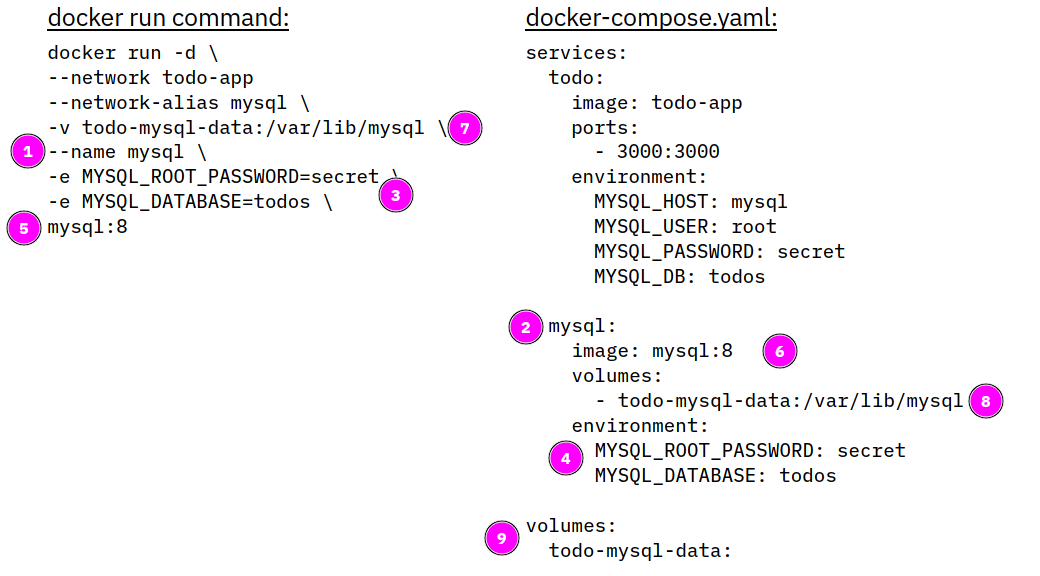
--nametag (1) will become the name of the servicemysql(2)- environment definitions (3) into
environment:section (4) - image name (5) into
image:section (6) -v(7) specified a volume indocker run, there is an equivalentvolumes:section (8)- Volumes must betodo-app defined in
docker-compose.yamlin a additionalvolumes:section which is on the same YAML indent level asservices:(9)
You may have noticed that there is no network defined, Docker Compose will automatically create a network for us. Also network-alias is not required for MySQL, every service automatically has a unique network name based on its service name, the todo container can connect to the mysql container with its name mysql.
There is a sample docker-compose.yaml in the app directory. It will be used when you start the workload with
docker compose up
This command will log all kind of messages to the console. When you look at them closely you will notice that most messages are from MySQL, but there are some messages from ToDo as well.
Docker Compose will pull images as needed, then it will create a network, a volume, and two containers:
✔ Network app_default           Created
✔ Volume "app_todo-mysql-data"  Created
✔ Container app-todo-1          Created
✔ Container app-mysql-1         Created
You can check with docker network ls that there is really a network called app_default, and with docker volume ls if the volume exists.
Dependencies
If for some reason the creation of the mysql service takes longer than the creation of the todo service (for example because of an initial pull of the MySQL image), the todo service will fail:
todo-1   | Waiting for mysql:3306............
todo-1   | Timeout
todo-1   | Error: connect ECONNREFUSED 172.21.0.3:3306
In this example log the ToDo app tried to connect to MySQL but the mysql service was not fully started. To prevent this you can create dependencies in the docker-compose.yaml by adding a depends_on statement to the todo service definition:
name: docker101

services:
  todo:
    image: todo-app
    depends_on:
      - mysql
    ports:
      - 3000:3000
    environment:
      MYSQL_HOST: mysql
      MYSQL_USER: root
      MYSQL_PASSWORD: secret
      MYSQL_DB: todos

  mysql:
    image: mysql:8.0
    volumes:
      - todo-mysql-data:/var/lib/mysql
    environment:
      MYSQL_ROOT_PASSWORD: secret
      MYSQL_DATABASE: todos

volumes:
  todo-mysql-data:
With this definition added, the mysql service will start first and then the todo service. Mission accomplished.
Starting and Stopping
If you started your workload with
docker compose up
you will see all output of Compose and the containers in the shell. You can stop the workload with Ctl-c or Cmd-c. This will result in stopped containers (check with docker ps -a).
You can remove the stopped containers with:
docker compose rm
You can start your workload daemonized in the background using
docker compose up -d
This will show two containers starting:
✔ Container app-mysql-1  Started
✔ Container app-todo-1  Started
To stop the workload, issue this command:
docker compose down
This will stop and remove the containers and remove the network, too. Of course, the volume isn’t removed!
To see the logs of your containers, enter:
docker compose logs [-f]
The optional -f (= follow) allows the log viewer to remain open and ‘follow’ the log messages as they come in.
Building container images
Docker Compose can also build container images. Simply add a build: statement to docker-compose.yaml. Here is example for the ToDo app, this assumes that the Dockerfile is in the same directory as docker-compose.yaml:
name: docker101

services:
  todo:
    build: .
    image: todo-app
    depends_on:
      - mysql
    ports:
      - 3000:3000
    environment:
      MYSQL_HOST: mysql
      MYSQL_USER: root
      MYSQL_PASSWORD: secret
      MYSQL_DB: todos

  mysql:
    image: mysql:8.0
    volumes:
      - todo-mysql-data:/var/lib/mysql
    environment:
      MYSQL_ROOT_PASSWORD: secret
      MYSQL_DATABASE: todos

volumes:
  todo-mysql-data:
Note the ‘.’ in the build: statement, this is the same period you would use at the end of a docker build command.
You can now either run a build by itself with:
docker compose build
or include a build in the startup if required with:
docker compose up --build
There a whole lot more possibilities with docker compose build. When building several different containers with a single docker-compose.yaml file you need to be able to specify more than one Dockerfile. To do this you can define a ‘context’. This can be another directory or even a Git repository. You can find examples in the Compose Build Specification.
Environment variables
In the above example we specified the environment variables directly in the docker-compose.yaml. It is preferable to ‘externalize’ the configuration (12 Factors!) and this is very easy with Docker Compose.
It is common practice to specify environment variables in file that is typically called .env (and spelled “Dotenv”). For probably every programming language there are libraries/extensions that automatically read a .env file if it is present, in Python it is called ‘python-dotenv’. A .env file for our example would look like this:
MYSQL_HOST: mysql
MYSQL_USER: root
MYSQL_PASSWORD: secret
MYSQL_DB: todos
MYSQL_ROOT_PASSWORD: secret
MYSQL_DATABASE: todos
Notice that MYSQL_PASSWORD and MYSQL_ROOT_PASSWORD as well as MYSQL_DB and MYSQL_DATABASE are duplicates. We can shorten the .env to:
MYSQL_HOST: mysql
MYSQL_USER: root
MYSQL_PASSWORD: secret
MYSQL_DB: todos
The .env file usually is in the same directory as the docker-compose.yaml file. The docker-compose.yaml is then adapted to use the .env file:
name: docker101

services:
  todo:
    build: .
    image: todo-app
    depends_on:
      - mysql
    ports:
      - 3000:3000
    environment:
      MYSQL_HOST: ${MYSQL_HOST}
      MYSQL_USER: ${MYSQL_USER}
      MYSQL_PASSWORD: ${MYSQL_PASSWORD}
      MYSQL_DB: ${MYSQL_DB}

  mysql:
    image: mysql:8.0
    volumes:
      - todo-mysql-data:/var/lib/mysql
    environment:
      MYSQL_ROOT_PASSWORD: ${MYSQL_PASSWORD}
      MYSQL_DATABASE: ${MYSQL_DB}

volumes:
  todo-mysql-data:
When you issue a docker compose up the .env is automatically read and the placeholders in the docker-compose.yaml are replaced with the values of variables in .env.
There are more possibilities with environment variables and .env files in the Docker documentation.
Congratulations! This concludes the workshop! You may want to have a look at the last topic:
Last Topic: Tips and useful commands